

Every year we try to document a little bit more of our knowledge and procedures for other teams to use and benefit from. This year we have released a varieties of guides that teams can learn from. We have collected them all here so you can see them in one place.

Protopipe is a system of 3D printed parts that allow you to easily connect 1/2" PVC pipe into robot mechanisms and test fixtures. It's designed to be cheap and easy to use so that teams can iterate their designs faster. Several teams have been printing out the connectors and testing the system this off-season and we have gotten some positive feedback. There is still room for improvement but we think it will help us and other teams develop better systems this season.

Protopipe - Blog Post - Documentation - CAD Files

Protopipe is a system of 3D printed parts that allow you to easily connect 1/2" PVC pipe into robot mechanisms and test fixtures. It's designed to be cheap and easy to use so that teams can iterate their designs faster. Several teams have been printing out the connectors and testing the system this off-season and we have gotten some positive feedback. There is still room for improvement but we think it will help us and other teams develop better systems this season.
Guide to the FRC MCC

We have been asked a lot about which parts teams should buy before the season. That's a really hard questions because you need to know the goals of the team. So in this document we outline the concept of a Minimum Competitive Concept Robot, give examples of teams that successfully build MCCs, and also a list of items that we would use to build an MCC. If you are just starting out or have limited resources these are the robots you should view as your inspiration.
FIRST Choice and Voucher Recommendations
We made a list of our recommended items to use your Vouchers and FIRST Choice credits to subliment your KOP.


Simple addressable LED control for FRC robots. This uses mostly COTS electronics and software to allow teams to add addressable LEDs to their robot and control them easily from a RoboRIO. This allows teams give feedback to their drivers using the LED strands or rings placed on their robot. Animations are handled on the microprocessor with the RoboRIO just sending simple serial messages to choose animations, colors, and other details.

Spectrum-Photon LED Animation Driver - Documentation - GitHub


Simple addressable LED control for FRC robots. This uses mostly COTS electronics and software to allow teams to add addressable LEDs to their robot and control them easily from a RoboRIO. This allows teams give feedback to their drivers using the LED strands or rings placed on their robot. Animations are handled on the microprocessor with the RoboRIO just sending simple serial messages to choose animations, colors, and other details.
Advanced Pneumatics Guide
We have gotten a lot of questions about our pneumatic system from our 2018 robot. We made some quick notes about the techniques we used to get a small and light system and also how we were able to use pneumatics to launch the cube. There are also some suggestions from other teams, special thanks to FRC#5406 for helping out with suggestions and edits.
 This guide gives you a quick overview of the equipment and process we use to powder coat our parts for our robots. We have been doing this for 2 years now and spoke to several teams before starting to do it ourselves. The process isn't that complicated and you don't need to buy or build a large oven to be able to do most of the parts you need on an FRC robot.
Powder Coating Guide - PDF
This guide gives you a quick overview of the equipment and process we use to powder coat our parts for our robots. We have been doing this for 2 years now and spoke to several teams before starting to do it ourselves. The process isn't that complicated and you don't need to buy or build a large oven to be able to do most of the parts you need on an FRC robot.Spectrum Recommended Software
A quick list of the most common software we use on Spectrum. There are alternatives to all of these but these are what we found works for us.
Printable 500 Hex Collar
Useful little printable hex collar. Great for load load applications and prototypes. Same thickness as a VEXpro Hex collar.2018 3847 Robot CAD
CAD of our 2018 robot Infrared. Solidworks and Step file.


Updated FIRST $1000
We did a quick update to our FIRST $1000 list to make sure all the products were available to teams.Spectrum 2018 Resource Collection
Here is the list of resources we released before last season, lots of that information is still useful today.
- Spectrum
"You get a new year, you get a new start, you get a new opportunity." - Billy Butler
We started today answering a whole host of kickoff questions. These were generated by looking at similar questions from teams FRC#1538 & FRC#2791 from previous years. These answers may not be perfect, so please leave a comment if you see something we got wrong.
"You get a new year, you get a new start, you get a new opportunity." - Billy Butler
January 6, 2019
2019 DDS: Day 1
Kickoff for our 9th season was today with the release of FRC Destination Deep Space.
See the reveal video below and read the manual here.
We started today answering a whole host of kickoff questions. These were generated by looking at similar questions from teams FRC#1538 & FRC#2791 from previous years. These answers may not be perfect, so please leave a comment if you see something we got wrong.
Kickoff Questions
We started constructing our field elements today. Tomorrow we will have even more progress.


- Spectrum
"We choose to go to the moon in this decade and do the other things, not because they are easy, but because they are hard, because that goal will serve to organize and measure the best of our energies and skills, because that challenge is one that we are willing to accept, one we are unwilling to postpone, and one which we intend to win, and the others, too." - President John F. Kennedy, September 12, 1962, at Rice University, Houston, Texas
"We choose to go to the moon in this decade and do the other things, not because they are easy, but because they are hard, because that goal will serve to organize and measure the best of our energies and skills, because that challenge is one that we are willing to accept, one we are unwilling to postpone, and one which we intend to win, and the others, too." - President John F. Kennedy, September 12, 1962, at Rice University, Houston, Texas
January 8, 2019
2019 Build Day 3: Starting to get a design together.
Most of today was spent finishing up playing field tasks but we also had a few prototypes and CAD sessions to help flush out the initial design of the robot.
Simple Pneumatic Hatch Mechanism
Here is our quick prototype of a simple pneumatic hatch mechanism. This is mounted just inside your frame perimeter on the front or back of your robot. You acquire a hatch by driving into the loading station hatch panel and the velcro takes it off the panel, the velcro is only on the top quarter of the hatch panel.. There are then 2 4"-6" pneumatic cylinders behind the panel and below all the velcro that let you push the panel on to any of the level one targets. This also works with a lot of misalignment and over your bumper. This design also doesn't let you throw the panel because if you activate the cylinder not at a wall the panel just flip ups and doesn't leave your robot.


Ball Intake Prototype
Floating rollers are very useful with ball so you don't have to reach as far out of your frame perimeter. Very happy to see our protopipe getting some use this year.


More pictures and videos of our prototypes can be found on our photo gallery.
- Spectrum
"Teamwork is the ability to work together toward a common vision. The ability to direct individual accomplishments toward organizational objectives. It is the fuel that allows common people to attain uncommon results." - Andrew Carnegie

"Teamwork is the ability to work together toward a common vision. The ability to direct individual accomplishments toward organizational objectives. It is the fuel that allows common people to attain uncommon results." - Andrew Carnegie
January 8, 2019
2019 Build Day 4: Drivetrain sketch and alignment mechanisms
Drivetrain
- Eight Wheeled Drivetrain
- 4” wheels - no need to go any larger because no possibility of driving on to the HAB sideways; climbing is always forward
- Can go over cable cover and the depot rails
- The Year of No Belly Pan
- Drivetrain will have supporting interior framework but will have no belly pan due to our climbing mechanism
Hatch Mechanism
We made the hatch mechanism more closely reasonable the dimensions we are planning for our actual robot. We started testing alignment aids. Our hope is that as we drive into the disk and it raises up and aligns to the center of our mechanism. Initial tests are promising but it may not work perfectly.


Alignment
Aligning to the goals and the loading station is going to be crucial this year. We are putting most of our early programming thought in to how best to use cameras to help us align.
Our current plan is to use a wide angle camera mounted on top of our scoring mechanism that will move up and down with our lift so that our drivers can visually confirm that our hatch or cargo are ready to score. We plan to have a limelight vision system looking through our elevator at a fixed height to help us align to the vision targets from further away as we move towards the goals or station. Finally we are hoping to use a Jevois camera mounted on our frame at a height below our front bumpers to visually track the white tape as if it was a road.
- Spectrum
"I know you've heard it a thousand times before. But it's true -- hard work pays off. If you want to be good, you have to practice, practice, practice. If you don't love something, then don't do it." - Ray Bradbury
- Spectrum
"I know you've heard it a thousand times before. But it's true -- hard work pays off. If you want to be good, you have to practice, practice, practice. If you don't love something, then don't do it." - Ray Bradbury
January 9, 2019
2019 Day 5: 1st Design Review
Ball Sizing Rings
We laser cut 3 ball sizing rings, 12.5", 13", and 13.5" in diameter. This lets us inflate balls to the various levels inside the tolerance range so that we can practice with the different inflation pressures. Balls at 12.5" and 13.5" behave differently in several aspects that we have noticed so during our interactions.
- Green = Go = Inflate More
- Yellow = Slow Down = You can stop inflating
- Red = STOP = You've inflated too much.


Design Reviews
We have decided to start doing design reviews every Tuesday (this week was Wednesday since we didn't have school yesterday).
Each subsystem team is responsible for making a few slides about their design and progress and presenting to the team. Here is an example slide from the elevator subsystem team.


The current subsystem list includes
- Drivetrain
- 8 - 4 in wheels
- 4 traction, 4 omnis
- 6 MiniCIM drive (may be NEO after evaluation)
- Approximately 12fps(JVN adjusted speed)
- Elevator
- cascading #25 chain elevator
- Intake
- floor cargo intake
- floating top roller
- Linear slide deployment to not interfere with the lvl 1 rocket scoring.
- Constant force springs used to tension it down
- Cargo Mechanism
- elevator cargo mechanism
- simple roller and dustpan design)
- Hatch Mechanism
- velcro and alignment device + pneumatics to deploy
- alignment device may be actuated if we think velcro is going to degrade too much
- Climber
- 4 Bar motorcycle lift style climbing mechanism.
- Programming
- Electronics
- MCC (we are designing and building an MCC for practice)
- Simple velcro+pneumatic hatch mechanism for lvl 1 hatches
- Single jointed arm with cargo intake that can floor collect and score in rocket levels 1 and 2 and the cargo ship bays.
All of this is still subject to change, but we have flushed out more of our design in the first 5 days then we have ever done before.
- Spectrum
“In preparing for battle I have always found that plans are useless, but planning is indispensable.” - Dwight D. Eisenhower
“In preparing for battle I have always found that plans are useless, but planning is indispensable.” - Dwight D. Eisenhower
January 11, 2019
2019 Day 6: Spectrum MCC
One of the projects we have added this year is building an MCC robot with some our new students. This gives us the ability to have them build, wire, and program a robot before the design for our actual 2019 robot is complete. It's also lets us have a robot to practice with/against and an example robot for the teams that we help throughout the season.
The goals for this robot are to be similar to those we explained in the FRC Guide to the MCC. We want this robot to be the 3rd robot on a competitive alliance.
We are still developing this but we wanted to get the basic idea published as teams are starting to finalize their designs and we hope some teams will be able to use ideas from this design to help them this season.
The goals for this robot are to be similar to those we explained in the FRC Guide to the MCC. We want this robot to be the 3rd robot on a competitive alliance.
We are still developing this but we wanted to get the basic idea published as teams are starting to finalize their designs and we hope some teams will be able to use ideas from this design to help them this season.
Strategic Analysis and Features
HAB
The current version of this robot ignores the HAB end game. It can drop off of HAB lvl 2 to start the match but is unable to climb up to lvl 2 or lvl 3 at the end of the match. It is a rather light robot and most of its weight is in the rear so it may be a good choice for a robot that lifts others on to the lvl 3 platform. Only 1 or 2 robots will be able to climb to lvl 3 in each match and it's likely that the highest seeded teams will be able to climb on their own so building ramps (also ramps are just hard in general) or other mechanism will most likely not help get you picked by high ranking teams. If you take anything from this please let it be that ramps are harder than you think, and teams are very bad at driving up ramps so please be very cautious when deciding to build a ramp bot (or better yet just don't build a ramp bot).
Hatch Panels
The hatch mechanism on this robot isn't fully flushed out but it will be able to score on all lvl 1 hatches using pneumatics and velcro. There is also enough room on the back for an alternative hatch mechanism if your team develops something else better than velcro and pneumatics to push the hatch off.
Cargo
Cargo is where this robot shines and is where we believe the most productive 3rd robots will have their strengths. Each cargo cycle is worth 50% more than a hatch cycle and you can start the game with 6 null hatches pre-installed giving you 6 free 3pt cargo cycles before you need to do a hatch cycle for 2 points.

- Floor loading lets this robot utilize the depot for its cargo cycles and free up the loading stations for the faster robots on its alliance who may have well practice or pre-programmed paths to/from the feeder station. Floor loading reduces your cycle time because it's possible that the balls will roll across the ground and come near your robot without you having to go back into the HAB.
- The in-frame intake mechanism means that while playing defense this MCC could take a cargo ball and bring it back to their side of the field to score. This will slow down the cycle time of their opponents.
- The single jointed arm can lift the cargo ball to score it in
- Rocket Level 1
- Rocket Level 2
- the Cargo Ship
- Those 3 scoring locations add up to a potential of 14 cargo scoring locations (not counting the 2 front cargo ship spot that start with cargo).
- Having the ability to score in Rocket Lvl 2 means that if this robot is paired with a robot that can hatch lvls 2 & 3 and score cargo in lvl 3, each of them only needs to score 6 game pieces to be able to complete the rocket and get the ranking point.

Mechanical Details
- Kitbot drive base
- The pictures shows a square 28"x28" AM14U3 because that is the drive base we happen to own but any kit chaiss dimension can perform this role, you would just have to change some of the dimensions of the arms and tower. A wider kit bot could have a wider intake, a longer kit bot may have more room for a hatch mechanism on the back.
- Reminder to make sure you cut your kit chassis to be within the 120" frame perimeter rule.
- Structure
- The design uses mostly 2x1 and 1x1 aluminum extrusion but it most of the cases this could be exchange for other materials that you already own or that you like to use. A robot with similar abilities can be built from wood, REV extrusion, Andymark Peanut extrusion and many more options.
- The CAD doesn't include all the gussets that would be needed to connect all the parts together.
- Single Jointed Arm
- A single motor, gearbox, and chain reduction is able to move the cargo intake up to score.
- There are a variety of ways to build a single jointed arm, the images show a AndyMark 100:1 57 gearbox mounted to two REV Universal Motor Brackets, driving a VEXpro 12t to 60t sprocket reduction.
- Surgical tubing would be added to the arm bars at the rear to help counterbalance the arm.
- Intake
- The intake is a simple roller, this could be wheels or a drum as shown in the images. The drum is based on the VEXpro Versaroller System.
- Many different gearboxes could power the intake including a Versaplanetary, or AM 57 Sport. Another option is to use the Two Sport Gearbox that teams received in the kit of parts but only install a single motor, that is what is shown.
- Hatch Mechanism
- Single pneumatic solenoid valve drive the two cylinder to release it from our velcro.
- Similar to prototype we posted here.
With only 2 motors and one solenoid valve used for scoring this Destination Deep Space robot would be very simple but able to contribute a lot during match it plays.
This CAD was done very quickly just to be a visual tool to help teams understand our plan. We will be developing it more before building our version of the Spectrum MCC this season. Much of the systems are incomplete so only use this as a model to get ideas from and not detailed plans to build a complete robot.
The STEP file for this quick CAD can be downloaded here.
Spectrum MCC


Scoring on Lvl 1 of the Rocket


Scoring on Lvl 2 of the Rocket
https://goo.gl/x3PTgj
Purchase List
We put together a purchase list that explains some of the items we recommend using in the Spectrum MCC.https://goo.gl/x3PTgj
- Spectrum
“That’s been one of my mantras — focus and simplicity. Simple can be harder than complex: You have to work hard to get your thinking clean to make it simple. But it’s worth it in the end because once you get there, you can move mountains.” - Steve Jobs 1998
“That’s been one of my mantras — focus and simplicity. Simple can be harder than complex: You have to work hard to get your thinking clean to make it simple. But it’s worth it in the end because once you get there, you can move mountains.” - Steve Jobs 1998
January 11, 2019
2019 Day 7: Allenless
Allenless
Today was no ordinary day of build season for Spectrum. It was our first of two days without our Lead Mentor, Allen Gregory. Sadly, FIRST Headquarters has claimed him for the weekend for LRI training. Despite Allen’s absence, we were still able to make progress on our subsystems.
Drivetrain
This year we positioned our gearbox at the front of our robot to create space for our climber. Each Side Panel will feature two traction wheels in the middle and an Omni wheel on each outer edge. Our Drivetrain has progressed rapidly and we are hoping to send it to our sheet metal sponsor, SolarCraft, sometime late next week.

Hatch Panel Intake
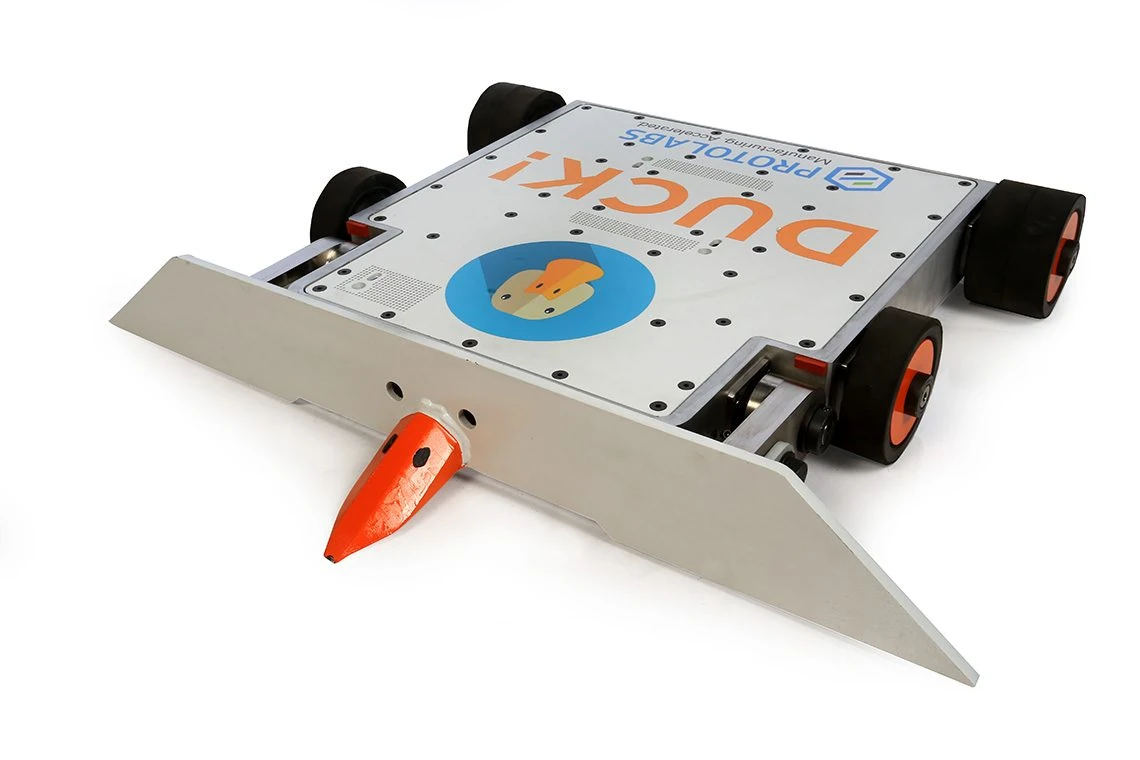
We continued to add to our hatch panel ‘DUCK!’ intake by designing in a pneumatic actuated ‘finger’. The ‘finger’ will keep the hatch panel in place during pickup and transportation until it gets scored.
Cargo Carrier
We made a prototype out of protopipe for our cargo carrier mechanism with a simple roller and dustpan design. This cargo mechanism will be attached to the inner carriage elevator and will spit out the cargo to score.

January 13, 2019
2019 Day 8: Allenless Part 2
Progress Report
The team spent the majority of their time in the lab today tuning their subsystem designs.
Sheet Metal Deadline
The subsystems that require sheet metal are really trying to meet next week's deadline and are hammering out the last big chunks of the design before lightening.
- Drivetrain
- Access and mounting holes have been added, and the encoder mount is underway
- Elevator
- The carriage is starting to come together. Bearings have been added to the side rails of the elevator as well as being sandwiched in between the plates on the carriage.
Intake
- Cargo Intake Box
- Part of today was also focused on intake geometry. The cargo box carries the ball to different positions on the elevator without obstructing the hatch mechanism.
- Hatch Subsystem Version 2
- The hatch intake has undergone an upgrade, including a new feature. While still in the prototyping stage, we had implemented a 'finger,' a 1/4" thick piece of Lexan placed above the (duck!) beak. A pneumatic cylinder actuates the finger and allows it to grab and secure that hatch so that any jostles by other robots do not impede the hatch from reaching the intended deployment zone.

Allenless Again...
The team has divided into two warring tribes who are battling for control over the name of the 2019 robot. Not really, but in all seriousness, we are diligently working while we await Allen's return from the blizzards of the north tomorrow morning.
- Spectrum
GUS’ 2011 robot featured a great chain driven cascading lift and a simple wrist intake. We have been heavily looking at their lift and power transmission for the elevator to get ideas for our elevator for this year.

"There is no substitute for hard work" - Thomas A. Edison
January 13, 2019
2019 Day 9: Inspiration
As we start bring our ideas to life in CAD there have been a few robots that we keep coming back to for inspiration.
GUS FRC#228 - 2011
CAD DownloadGUS’ 2011 robot featured a great chain driven cascading lift and a simple wrist intake. We have been heavily looking at their lift and power transmission for the elevator to get ideas for our elevator for this year.

Simbotics FRC#1114 - 2011
CAD Download
Simbotics' 2011 robot also had a cascading lift but there design was based around sheet metal manufacturing which more closely mirrors how Spectrum builds it's robots.


Robowranglers FRC#148 - 2011
CAD Download
The Robowranglers' 2011 robot features an awesome extending link for the top bar on it's 4 bar arm. We have been looking at this CAD as an example for how to do a simple extension that we will be using on our Cargo intake.


Here is the current state of one of the intake extensions.

- Spectrum

- Spectrum
“A complex system that works is invariably found to have evolved from a simple system that worked. A complex system designed from scratch never works and cannot be patched up to make it work. You have to start over, beginning with a working simple system.” - John Gall
January 15, 2019
2019 Day 10
Cargo Mechanism
This will hold the cargo on the elevator. The mechanism will intake it from the over the bumper ball mechanism. The tilt of this mechanism lets us start the cargo on the elevator higher reducing the amount of height we need to in our elevator to reach the 3rd level of the Rocket.


Hatch Mechanism
This is the intake for hatches from the loading station. It's mounted above the cargo mechanism and flips into the correct orientation when the cargo mechanism is pointed down. This allows us to start the match while holding a hatch and still flip it down closer to the edge of our frame perimeter.

Since then he has posted another video that is actually closer to what we are really working on.
Here are some of the current sketches of our climbing mechanism.


We are planning for the main central arm to be sheetmetal and for the two rear arms to be round tube with tie rod ends since those members are mostly only experiencing forces in tension.

- Spectrum
January 16, 2019
2019 Day 11: Climber Development
Climber
The idea for our climber came from sforbes' youtube video below.Since then he has posted another video that is actually closer to what we are really working on.
Here are some of the current sketches of our climbing mechanism.
We are planning for the main central arm to be sheetmetal and for the two rear arms to be round tube with tie rod ends since those members are mostly only experiencing forces in tension.
Protopipe Cargo Mechanism
We have an updated cargo mechanism prototype that is helping us solve for some of the variables for that mechanism.
We are able to change the height of the roller, the length of the bottom plate, the locations of the rear stop bar and more.


- Spectrum


- Spectrum
January 17, 2019
2019 Day 12: CAD Updates
CAD Updates


We still have a lot of work to do before this design is ready for production but we are solving a lot of the problems and getting closer to production. None of our subsystems have made any large changes it's just more and more development at this point.
- Spectrum
January 18, 2019
2019 Day 13: Cargo Mechanism Protopipe
We have been successfully using Protopipe this season to test our cargo designs. It has let us make rapid iterations.
Today we quickly added a bottom roller to help eject cargo further than we were before. On the real design this bottom roller may be accuated to help us intake cargo from the floor as well.


- Spectrum
January 19, 2019
2019 Day 14: Elevator
Elevator
The elevator on this year's robot is a simple two stage cascading chain lift. Nothing too complicated. The cargo floor intake raises the ball to 15" from the floor with the elevator completely down so that we only need to lift ~63" to get the cargo centered with the highest rocket opening.


- Spectrum


- Spectrum
January 20, 2019
2019 Day 15: Cargo Intake Prototype
We have spent some time putting together a more complete intake prototype. Our protopipe system has been a huge help with this. The same frame we used for the original prototype has been able to be rapidly modified in multiple ways to continue it's usefulness in our testing.


We have been able to build the intake mechanism to the same angle and heights that we have in CAD and even be able to add multiple moving and hinged parts. An old set of bumpers were set on 2x4s to mimic this year's bumper height and the prototype was placed inside of them at the right distance and height.


We found that we can easily add constant force springs to the protopipe setup by just sliding them over a section of pipe and screwing them in to the moving arm.


We found that we can easily add constant force springs to the protopipe setup by just sliding them over a section of pipe and screwing them in to the moving arm.

- Spectrum
January 22, 2019
2019 Day 16 & 17: CAD and Drawings
We spent the long weekend getting the drive train, elevator, and climber ready to be sent off to our sponsor Solarcraft Inc. for laser cutting and bending.


For each part we have to make sure the part is created properly with the correct bend deduction and bend radius, and then create flat pattern dxfs, part bend drawings, and pdfs for each part. We sent off about 30 unique parts on this run and that doesn't include mirrored parts.

- Spectrum

- Spectrum
January 22, 2019
2019 Day 18: CAD release
We are releasing the STEP file for the 3 subsystems that we sent off to be laser cut this morning.
You can view it online in the grabcad file viewer. Grabcad doesn't interact with native Solidworks 2018 files like it does 2016 so it's harder for us to share the native solidworks file but if anyone is interested in those we can release those as well.

- Spectrum


To a lower pivoting intake that mounts on the side of the cargo mechanism that is on the elevator.

We have built complicated contraptions like this one to try to test out concepts and prove the functionality of certain designs.

We made some crude hacks to see exactly what really works to try to force this ball into the center of the robot.

Over the past few days we have gone back to reevaluate some of our assumptions. Phrases like “What if they were both bottom rollers?”, “The only thing changing is gravity”. “This is the same really complicated sketch we have been looking at for 2 weeks, I just remade it and added colors.”, “Who’s spring is this?”, “Everything is Changing!”, and “What if we just flipped it all upside down?” have all been said and have been pretty important to the design process.
This is the sketch in question

Most of the robot gets designed in 2D like this before moving to 3D for the prototyping. This morning that was all we had after a lot of discussion last night about the changes and yes “flipping everything upside down”. After about 2 hours of really fast CAD this afternoon we had a plan to build this.

This lets us put the prototype on the floor at the height that it will actually be on the robot when in this tipped down position.
It took another 4-5 hours to get it built and fully functional. That included laser cutting the panels, getting the rubber on too the polycarbonate tubing, pressing in tube connector nuts, and more.


We powered it using out prototype electrical board and our test pneumatics system that now uses our portable 60v Dewalt Compressor. The electrical board runs each motor off of a 20A breaker which is very useful because we did stall them a few times but the breakers did their job and prevented the motors from overheating.


Here it is in action.

The roller system we are using is new to us this year. We have been trying to avoid having hex shafts go through bearings as much as possible because those systems always seem hard to maintain when you need to remove or add something.
Our roller system this year uses a 7/8“ dead axle shaft with a 1.25“ OD polycarbonate tube around it. The polycarbonate tube is running on two needle bearings and it’s driven by a 3d printed pulley that has an integrated clamp to grip the tube. This setup lets us install and remove the roller with only two bolts going into the tube connector nuts pressed into the ends of the 7/8“ shaft.

This version of the intake still has a lot of testing to do, and it’s very possible that everything may change again but we made a lot of progress today.
Spectrum 2019 CAD Progress 1-22-19
You can view it online in the grabcad file viewer. Grabcad doesn't interact with native Solidworks 2018 files like it does 2016 so it's harder for us to share the native solidworks file but if anyone is interested in those we can release those as well.

- Spectrum
January 27, 2019
2019 Day 19, 20, 21: Cargo stuff is Changing
The theme of our two Cargo manipulation groups for the past two weeks has been “EVERYTHING IS CHANGING!”
This has been said at least once every other day about both our intake and the mechanism that wills store it and spit it out in to the rocket and cargo ship.
We have posted it about some of these changes from the our original concept of an extending intake that stayed down on the frame.


To a lower pivoting intake that mounts on the side of the cargo mechanism that is on the elevator.

We have built complicated contraptions like this one to try to test out concepts and prove the functionality of certain designs.
We made some crude hacks to see exactly what really works to try to force this ball into the center of the robot.
Over the past few days we have gone back to reevaluate some of our assumptions. Phrases like “What if they were both bottom rollers?”, “The only thing changing is gravity”. “This is the same really complicated sketch we have been looking at for 2 weeks, I just remade it and added colors.”, “Who’s spring is this?”, “Everything is Changing!”, and “What if we just flipped it all upside down?” have all been said and have been pretty important to the design process.
This is the sketch in question
Most of the robot gets designed in 2D like this before moving to 3D for the prototyping. This morning that was all we had after a lot of discussion last night about the changes and yes “flipping everything upside down”. After about 2 hours of really fast CAD this afternoon we had a plan to build this.
This lets us put the prototype on the floor at the height that it will actually be on the robot when in this tipped down position.
It took another 4-5 hours to get it built and fully functional. That included laser cutting the panels, getting the rubber on too the polycarbonate tubing, pressing in tube connector nuts, and more.
We powered it using out prototype electrical board and our test pneumatics system that now uses our portable 60v Dewalt Compressor. The electrical board runs each motor off of a 20A breaker which is very useful because we did stall them a few times but the breakers did their job and prevented the motors from overheating.
Here it is in action.

The roller system we are using is new to us this year. We have been trying to avoid having hex shafts go through bearings as much as possible because those systems always seem hard to maintain when you need to remove or add something.
Our roller system this year uses a 7/8“ dead axle shaft with a 1.25“ OD polycarbonate tube around it. The polycarbonate tube is running on two needle bearings and it’s driven by a 3d printed pulley that has an integrated clamp to grip the tube. This setup lets us install and remove the roller with only two bolts going into the tube connector nuts pressed into the ends of the 7/8“ shaft.
This version of the intake still has a lot of testing to do, and it’s very possible that everything may change again but we made a lot of progress today.
Painting our practice field
The past few days we have also been working on finishing up our practice space and adding a dash of color to the elements.


- Spectrum
- Spectrum
February 4, 2019
2019: Week 4 Recap
In week 4 we received our first sheet metal parts of the season. Huge thank you to our sponsor Solarcraft Inc, for their continued support of our team with their generous donation of sheet metal parts each season.
We have more photos and video of the robot and prototypes on our photo album.
https://photos.spectrum3847.org/2019-FRC/X-Ray-2019/
The practice bot is almost wired and it still needs the climber and scoring mechanisms attached to it.


- Spectrum
February 8, 2019
2019 Day 34: CAD Update
We are progressing nicely though our design and build. The practice bot is just about ready to have its first test runs after we bring up all the electronics (assign CAN IDs, update firmware, etc). The wooden plates will become plastic as we finalize our geometry.


We also have updated our public CAD release to the current version of the robot. The hatch mechanism is still undergoing revisions but the majority of the rest of the robot is there. You can view and download the STEP file at the link below.
https://workbench.grabcad.com/workbench/projects/gc9jNvnszkrrVR9nWhwEHqGmFzdSl9BPI9HepOdZ7ObWL1#/space/gcJc1n7AnXmeuQffJLVnhnGI63PTh0AZgIBBOmjM7XmRuW/link/1749488

We have been making progress. The practice bot is operational but all the mechanisms are still getting tweaked. The competition robot is getting wired and the competition cargo mechanism and hatch mechanism still need to be built. The climber is also undergoing some improvements for the competition version as well.
- Spectrum
https://workbench.grabcad.com/workbench/projects/gc9jNvnszkrrVR9nWhwEHqGmFzdSl9BPI9HepOdZ7ObWL1#/space/gcJc1n7AnXmeuQffJLVnhnGI63PTh0AZgIBBOmjM7XmRuW/link/1749488
You can also see a lot of our newer photos and videos on our photo gallery.
https://photos.spectrum3847.org/2019-FRC/X-Ray-2019
- Spectrum
https://photos.spectrum3847.org/2019-FRC/X-Ray-2019
- Spectrum
February 16, 2019
2019 Day 41: Hatches are scoring

We have been making progress. The practice bot is operational but all the mechanisms are still getting tweaked. The competition robot is getting wired and the competition cargo mechanism and hatch mechanism still need to be built. The climber is also undergoing some improvements for the competition version as well.
- Spectrum
February 27, 2019
Ready for El Paso District Event
We compete this Saturday and Sunday at the El Paso District.
You can watch the live stream here: https://www.twitch.tv/
We have been driving with our practice robot for the past week and getting ready. On Sunday we were able to go practice with 118 at their practice field and actually play on a full field.

You can watch the live stream here: https://www.twitch.tv/
We have been driving with our practice robot for the past week and getting ready. On Sunday we were able to go practice with 118 at their practice field and actually play on a full field.

Sometimes it pays to be lucky.
- Spectrum
- Spectrum
March 25, 2019
El Paso Recap Video
May 10, 2019
2019 - Woodie Flowers Award
As many of you know our mentor, Allen Gregory, won the 2019 Woodie Flowers Award. The support that both the team and Allen has gotten these past few weeks have been phenomenal. Thank you to everyone who has congratulated us and shown support. Many people have requested to see the Woodie Flowers Essay that the students of our team put together so we will share it here.
You can read the winning essay that our fellow Spectrum team members wrote here: Allen Gregory - 2019 Woodie Flowers Essay PDF
We have put together a gallery of some of the photos and video here: Woodie Flowers Award Photos
You can also view Allen's Thank you note on ChiefDelphi: Allen's Woodie Flowers Thank You Note
You can read the winning essay that our fellow Spectrum team members wrote here: Allen Gregory - 2019 Woodie Flowers Essay PDF
We have put together a gallery of some of the photos and video here: Woodie Flowers Award Photos
You can also view Allen's Thank you note on ChiefDelphi: Allen's Woodie Flowers Thank You Note